Thursday, May 28, 2020

Week 2 and 3- lots of repeats and one new recipe


Got behind a little bit, but here's what's been in the CSA the past two weeks
Week 2: May 16, 2020


  • 1 lb salad mix'
  • 1 head lettuce
  • 1 bunch carrots (tip: cut the greens off the carrots when you get them home.  You can use the greens like parsley, and the carrots won't go soft)
  • 1 bunch kale
  • 1 bunch collards
  • 1 kohlrabi
  • 1/2 lb spinach


Week 3: May 22, 2020

  • 1 lb spicy mustard mix
  • 2 heads lettuce
  • 1 lb swiss/rainbow chard
  • 1 buch radish
  • 1 cabbage
  • 2 cucumbers
  • microgreens
I've cooked a number of things over the past two weeks, and almost managed to eat all the salad.  Fortunately since the lettuce we get from the farm is so fresh, it really keeps well.  I know I'm on lettuce overload right now, but I also know I'll miss it later this summer.

Haven't made too much new recently, but here are some good recipes I've repeated:
One new recipe I made with the carrots was Lemon Rosemary Chicken Thighs with Vegetables

It was pretty good.  I used the recipe as a starting point, and modified it a bit.  You need:
  • 3 tablespoons olive oil
  •  2 tablespoons chopped fresh rosemary
  • 4 large garlic cloves, pressed through garlic press or finely chopped
  •  Juice of 2 lemons
  • 1 teaspoon kosher salt (Diamond Crystal)
  • 1/2 teaspoon freshly ground Black Pepper
  • 2 lbs bone in skin on chicken thighs (this was 4 for me)
  • 1 bunch carrots, peeled and cut into relatively uniform pieces (about the size of the "baby carrots" you see at the grocery store).
  • 1 lb yukon gold potatoes, cut into roughly 1" chunks (I did not peel them)
  • 1 vidalia onion (or other sweet onion) cut into roughly 1" chunks
If you have time, season the chicken thighs w/ 1-2 tsp salt and store in the fridge overnight.

Preheat oven to 425°F (I used the convection feature on my oven)  Cover a sheet pan with Al foil and spray with olive oil.  Whisk together the first six ingredients ( olive oil through pepper).  Add the rest of the ingredients, tossing well to coat. Spread everything out on the sheet pan, making sure the vegetables are in one layer and the chicken thighs are skin side up.  Roast for 40 minutes, checking the chicken with an instant-read thermometer to make sure it's at least 165°F.

Still have the cabbage, cucumbers and kohlrabi to use up!


Monday, May 25, 2020

Asian Chicken Salad/Wraps

Wut?  I haven't posted this yet?  A quick search tell me no.  So for folks trying to use up all the salad greens we're getting in the CSA right now, this is for you. This is one of my favorite recipes.  It's designed to be eaten as "lettuce wraps" ala PF Changs (or Phoenix Asian Cuisine if you'd like to go local) but I find that the lettuce wraps fall apart so I just like to serve it as a salad.

Skinnytaste has some amazing recipes, and this is one: https://www.skinnytaste.com/asian-chicken-lettuce-wraps/

I almost always make it with 2x the chicken called for as well as extra mushroom. Multiply the sauces accordingly.   I've also used excess water chestnuts (because what the heck are you going to use with the rest of the can?) as well as more mushroom.  In addition to having used more dried shitake than might be called for, I've also used a good amount of fresh, especially if available through the CSA.  But really, this recipe is all about using up the lettuce.

You'll need to make a trip to Super G to get all the different ingredients, but once you have them, they last FOREVER in your fridge.  I substitute korean gochuchang for the "white pepper" called for in the main recipe, and the same for the sauce (or siracha if you don't want to try and dissolve the gochuchang).

 So, long story short, the easiest way to do this is to cook up the chicken after marinating in all the sauces/spices, chop up the lettuce, and scatter the former over the latter (with a few good spoonfuls of rice).  And then add a good drizzle of sauce, with extra siracha or hoisin as you like.  Eat it up.

Here's a pic:


Friday, May 15, 2020

And we're back with the CSA for 2020!

Something has to go well in 2020, right?  For right now, we've got 25 weeks of the Guilford College Farm CSA to look forward to.  Last week was the first week, but I had this little biochemistry class in 3-weeks thing going on, so I didn't get a chance to post.  So here's the beauty shot:

What all did we have?  '
1 lb salad mix
1 bunch golden and red beets with greens
1/2 lb arugula
1 bunch mustard greens
1/2 lb spinach
1.5 lb cornmeal

An excellent start!  I did manage to use everything last week, except for the beets and the cornmeal, but they'll both keep.  I gave 1/2 lb of the salad greens to one of my students.  What did I make?
Some "classics" like Crispy Spinach Pizza (subbed some dodgy Manchego in our fridge for the romano), Salad Pizza with arugula pesto and, well, just salad with grilled pork tenderloin, veggies and this Zesty Buttermilk Avocado Dressing.


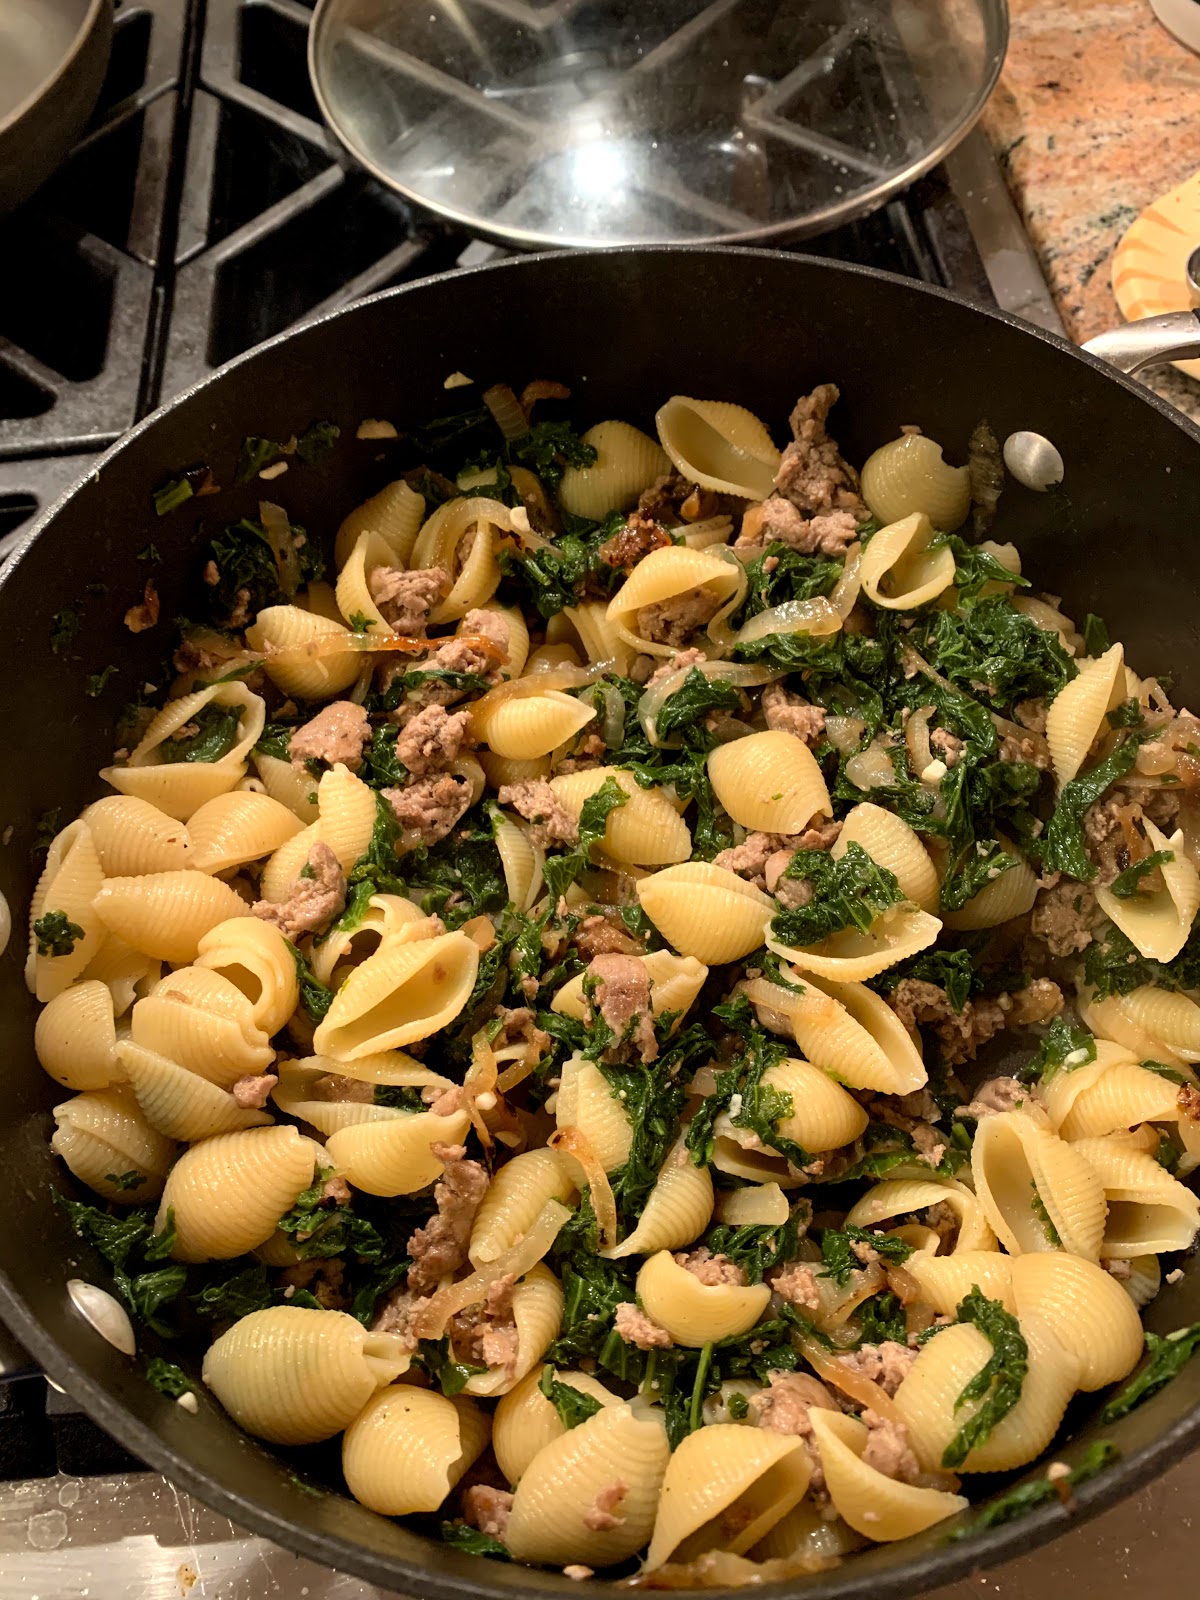
The new recipe I made was with the mustard greens, so if you've got the 1/2 share the week of May 15, this is for you, cuz' y'all got the mustard greens this week. Of course there are a million recipes for pasta, sausage and greens out there, and I adapted this one from a blog by nutrionist Rachel Hartley, but don't let that scare you. The sweetness of the onions goes well with the mustard greens.  You could use sweet italian sausage, or leave out the meat all together.

Mustard Green and Sausage Orrechiette (4 servings, 2 dinner and 2 lunch)
Ingredients:
1 lb turkey Italian sausage (hot), removed from casings
8 oz dried orrechiette pasta (mine was from HT)
2 medium Vidalia (or other sweet) onions, cut in half through the root and thinly slice crosswise
2 cloves garlic, peeled and chopped.
1/2 cup chicken stock (better than bullion to the rescue)
8-10 ounces mustard greens, large stems removed, roughly chopped (this is about what I got out of the bunch I got in the CSA)
Grated parmigiano reggiano to taste (1-2 oz per serving)

Directions:
  1. Cook the pasta in a pot of boiling salted water according to directions on package until al dente. Drain, reserving starchy pasta water.
  2. Brown sausage - drain and reserve a few tsp of fat.
  3. While waiting for the pasta water to boil, heat 2 tsp of olive oil (or reserved fat from sausage) in a large non-stick skillet (12") or dutch oven (5 qt, this is what I used) add onion and cook 3-5 minutes until translucent.  Add garlic and cook another minute. Remove from pan and reserve.
  4. Add broth to pan, scraping up any browned bits.
  5. Add mustard greens to pan, cover as they wilt down and cook 6-10 minutes until desired tenderness (you may need to add a little water).  
  6. Add sausage, onion mixture  and pasta to pan, and stir in some of the pasta water to make a sauce (1/2 cup or so?).  
  7. Serve w/ generous grating of parmigiano reggiano.
Some pics!
Sliced onions sauteeing:

 Prepping ingredients ingredients:
 Cooking the snausage:
 Greens and pasta ready to go:


Putting it all together:


 Plated up!

Ooops.  Forgot.  It was delicious.


Sunday, April 12, 2020

Happy Easter!

On Easter I like to make lamb.  I'd really like to make some amazing Enno Farms lamb, but this year we had to make do w/ a boneless leg of lamb from Harris Teeter.

For lamb, I adapt a recipe my mom made for many years - it was published in the "Heritage of Hospitality" cookbook, a Junior League cookbook published in 1975 and the first cookbook I ever owned:

The things that I keep the same: the amount of red wine.  Everything else, I amp up.  Two cloves of garlic?  No-  three or four!  1/8 teaspoon herbs?  No, handfuls of chopped fresh herbs, what ever you've got, but hopefully rosemary, oregano and thyme. 1/2 tsp worchestershire - what even is that?  A few glugs from the bottle.  A tbs or two of olive oil, not 1/2 cup.  I don't know why 1970's cookbooks were so afraid of spices  - and earlier ones - you can find recipes for spaghetti sauce in 1950's cookbooks that call for 1/8 teaspoon dried basil - you might as well just think about basil while you are making the sauce.

To cook, I light a chimney of charcoal and let it get white hot, pour it out on one side of the grill and cook the lamb leg over it until it's browned on both sides (about 5-10  min stop when it starts flaring up) then move it over to the cool side of the grill and cook until a thermometer tells me it's about 125°F in the thickest parts. Take off and let rest.

To serve with it I make this chimichurri from Serious Eats (I add 1/2 the amount of olive oil and whiz everything up in the blender or food processor).  I also make this potatoes gratin from Food52 (I use 2% milk and salted butter, it's fine) and finally grill up some asparagus tossed in olive oil, salt and pepper because it's the season.


Happy Easter!

Monday, April 6, 2020

Ribbolita

This is a delicious soup that has many versions - the one I use is closest to the one Giada de Laurentis published on Food Network several years ago.  What do I change?

You can buy the pancetta pre-chopped.  I don't use the olive oil (or only 1-2 tsp).  What I do is put the pancetta in the pot, add about 1/2 cup of water and simmer.  That renders out some of  the fat so by the time the water evaporates you can brown the pancetta in its rendered fat. Take the browned pancetta out and saute the onions and carrots in the rendered fat (adding a little olive oil if you think you need it).  Add the garlic and follow the recipe more or less as written.  I also add extra veg, adding more onion and carrot (1-2 cups each) and two of the boxes of chopped spinach rather than a 1lb bag.  If you do that you'll need to up the chicken stock a bit, and canned is FINE.  To serve I don't pour it over a toasted cibatta, but rather usually cut a baguette into slices (or that cool new no-knead bread I just made), spray with olive oil and toast until browned, then rub them with a garlic clove as described for the cibatta. and serve them on the side.  But it's darn tasty w/o the bread and freezes well.
A couple of pics - I got none.  Just imagine.


Sunday, March 22, 2020

Re-Starting the blog - coronavirus edition

Well, that's not the best reason to start up again, but it is what it is.  The coronavirus has everyone trapped at home (or at least primarily working from home).  People are panic-buying meat, bread, juice, yogurt and of course, toilet paper. (what??). The Greensboro Farmer's Curb Market, where I usually get eggs and bread as well as vegetables, is suspended for the time being.  My friend and colleague Marlene Macauley had to essentially cancel the rest of her "bread and cheese" Sustainable Food Systems  class, so she shared some of her bread flour from Lindley Mills with us.  I plan to make a giant pot of soup tomorrow, and I want some toasted bread to go with it. So, finally, it's time to try out one of the "no-knead" bread recipes.   The version I used was from Food 52, and it came out pretty awesome.  Here you go:

The recipe: https://food52.com/recipes/21370-no-knead-country-loaf

What did it look like?  Let me take you through the steps..
Mixing it all together:

Lettin' it chill out for about 18 hours under the cool towel Rob brought me from the Matrurango Museum in Ridgecrest:
It'll look pretty knarly after 12-18:

Then, turn out the dough onto a floured surface and shape it into a ball:

Put the dough ball back on the towel (dust with flour), wrap it up loosely and let it rise another 2 hours.  During the last half hour of rising, put a 5 qt enamel cast iron dutch oven (Le Cruset is a common brand) in the oven and preheat to 475°F.  Once the oven is preheated, take the pot out of the oven, sprinkle the bottom of the pot with cornmeal or flour (I used cornmeal) and drop in the dough ball, seam side UP! Put on the cover, put it in the oven, and bake for 30 min.  Take off the cover, and bake another 10 min or so until golden brown and delicious:
Let it cool an hour or as long as you can stand and slice and eat:


Sunday, September 29, 2019

Hello!  Sorry it's been a bit.  If you are a reader, you're probably looking at me reproachfully like the Guilford Farm cats, Oliver and Katie:
(they did get some food).

What can I say?  It's been a busy month.  The part of teaching all of Organic Chemistry I from August 21-September 11 was especially busy.  But I've got a few things in my phone to share, and a giant backlog of hot peppers and okra I need to do something with.  But for today, let's talk about watermelon.  I made this a few weeks ago, but now I have another watermelon in this week's CSA so I'll be making it again soon.

I've cooked a lot from Vivian Howard's Deep Run Roots, which makes sense, since her book is organized around produce in North Carolina.  This recipe looks crazy, but I promise (just like like Vivian does) that it tastes great!   The recipe for Country Style Pork Ribs in Red Curry Braised Watermelon calls for "pork shoulder or blade steaks" which are just sliced up pork shoulder or "Boston Butt".  I have no idea why they are called "country style ribs" but it's good to know that's what those are, especially if you have a recipe that calls for 2-3 lbs of pork shoulder and the only pork shoulders you can find are the 6-10 lb behemoths at the grocery store.  This is easy to put together and delicious served over rice.

Ingredients

  • 1 tablespoon vegetable oil
  • 4 8-ounce pork shoulder or blade steaks
  • 3 teaspoons salt
  • 1 teaspoon black pepper
  • 2/3 cup red wine vinegar
  • 1/3 cup honey
  • 3 tablespoons red curry paste
  • 2 teaspoons fish sauce
  • 5 cups watermelon, cut into 1 1/2-inch cubes, seeds removed


First you need a watermelon:
Once you've got the rind off, chunk it up so you've got about 5 cups

Heat up the oil in a enameled cast iron dutch oven, and brown the ribs you've seasoned with salt and pepper:
Dump the watermelon on top, and add the rest of the ingredients that you've whisked together
Slap on the lid, slide it into a 350° oven and braise for 1 1/2 hours.  Then remove the lid and let it cook for 30 min more.  Serve over rice to soak up the broth.

Plated up with a little of Thai basil garnish: